Thursday, June 30, 2011

Enterpreneur in Training

...ok so maybe the title is a little ambitious, but I at least want to give it my best shot! 

I've been pretty obsessed with a website called "Etsy" for a long time.  If you are not familiar with it, it is basically the "Buy it now" section of Ebay, but for handmade and vintage items as well as supplies.  I've bought a few things on it, and look at it multiple times a day.  Its on my daily list of facebook, ApartmentTherapy.com, TheKitchn.com, craigslist, and Hoboken News sites that I go through almost religiously.  I've always thought myself to be crafty, but I would have never thought to try to sell any of my crafts and goods online, or anywhere really. 

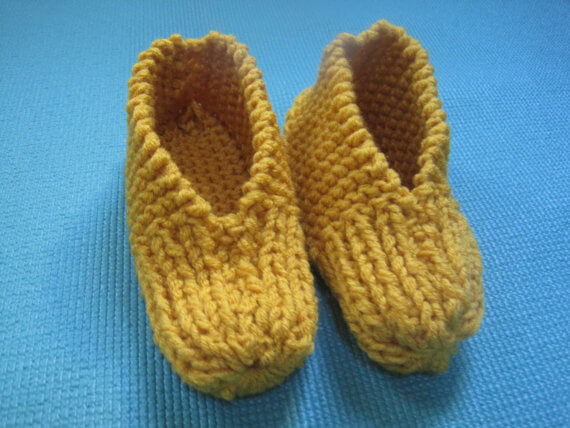
Etsy is the perfect solution! It only costs me $0.20 to post, and they get 3.5% of the sale, not bad!  Last night I finally posted an item!  I posted slippers that I knitted.  They are made from a pattern given to me from my grandma, a pattern that she has used to knit slippers for all of her grandchildren, and even some of my friends (well, before I learned how to knit).  They are cute, fun, SUPER comfy, and so simple to make.  I always asked my grandma to put a puff ball on the ones she made for me, but I wasn't sure how people would like it, so I left it off of the ones I posted (maybe I will post another paid WITH a puff?).


Though my store on Etsy looks a little grim, with only one post, I hope to increase the inventory (haha, I have to use business terms in this newly found business).  Many stores have hundreds of items, but I hope those people either craft for a living, or have helpers, because that's just nuts to have so many things for sale!  Can you imagine if I had 100 pairs of slippers for sale in my apartment!? They would all probably get thrown away in my other half's decluttering rampages.  None the less, I hope people begin buying my knitted goods, it would be nice to have a little extra income! If I do the math though, I only make about $4/hour doing it, but it's ok, I enjoy it! 

For those of you who saw pictures from Santacon, I will be posting Santa beard hats around the holiday season, so keep your eyes out for them!  I need to perfect the pattern a little more before doing so, but it's only summer, right? I have lots of time!

Here's the link to my (only) post on Etsy, and maybe you can peruse to millions of other items posted, and help support small businesses alike!

http://www.etsy.com/listing/76920826/yellow-knitted-slippers?ref=pr_shop

Toodles.
J&H

Wednesday, June 29, 2011

Rice... demystified.

Do you use "minute rice"? ...or do you make rice in a rice cooker? ...or do you just avoid it at all costs because it's just too difficult to make?  Does the rice always stick to the bottom of the pan just caked on like glue?

We have found a solution to making perfect rice easy enough for beginner cooks, so there's no excuse for taking the easy route by making minute rice, when you can just buy the regular stuff that will taste soo much better.  We buy our rice from the Asian grocery store in the huge bags you have to dedicate a whole bottom cupboard for, but for those of you who would never go through a bag this big, Carolina Rice, or other off brands are just as good!

1. Put rice in a pan and rinse with water 2-3 times.  This provides a better quality rice when finished.


2. Add water to the pan until you reach a 2:1 water to rice ratio.  If you rinse the rice first, you never know exactly how much water is in the pan, so I do a simpler test of putting my finger in the pan.  When my finger hits the bottom of the pan, if rice goes halfway up to the top of the water, I'm good.

3. Bring rice to a boil by just putting your burner on high, stirring constantly so no rice sticks to the bottom.


4. Turn to low heat and let simmer (covered with a lid) for 23-25 minutes.  DON'T look at the rice... it will be fine!  If you keep opening the lid and stirring the rice, it will not turn out nicely.

5. Turn the burner off, and let rest for 10 minutes.  If you have an electric stove, move to cool burner or trivet.  This is the crucial part that allows the rice to "unstick" from the bottom of the pan.

6. Open the lid, fluff rice with a fork (or rice spatula) and serve.  The rice will stay really hot if you don't stir it a lot and keep the lid on.


See!! No sticking!! (though sometimes I really do love the crunchies at the bottom of the pan, I just HATE cleaning the pan when only some of the crunchies come off, and the rest are rock hard)


Trust me, it's well worth it to do it right! ....and so simple.  I've heard so many people say they are afraid of cooking rice, or are just shocked when they hear we don't use a rice cooker (well... we make bread too and don't use a breadmaker... rice and bread did exist before the 20th century made a gadget for everything!)  ...and for those of you who swear by Minute Rice, I beg you to give this a try!

If you aren't a fan of simple white rice, try cooking the rice in chicken broth instead, or adding some spices to it before cooking.  Maybe add fresh chopped cilantro or parsley to the cooked rice.  The possibilities are endless!

Enjoy, and happy cooking :D
J&H

Sunday, June 26, 2011

Sunday Funday

How can the day be filled with a trip to A&P, fresh ground and brewed 44 North Coffee, homemade poptarts, meatballs, bread, chicken salad, cucumber tomato feta salad, knitted slippers, and a new blog... and we STILL feel like we had a relaxing day?  ...because everything was something we enjoy.

Welcome to Two Peas.  We cook, we craft, we do what we love, and like to have fun.  Living in Hoboken has proven to be a challenge, given our roughly 350sf apartment and our passion for all things kitchen and craft (and video games, but I certainly won't be blogging about that, unless my other half sneaks on here and writes, but given his track record on blogs, that won't be happening anytime soon!)  It's a good thing we really like one another, otherwise we would be pulling our hair out with the mess we can make in just a few seconds, whether it's me stringing yarn all over our 8x11 living room, or flour covering all 3' of counter space we have in our kitchen.

We have grown to love our small space, and really live with what we have.  It wasn't easy getting to this point though... a few decluttering rampages, and me getting "the talk" about "babe... do you really need to have 6 winter coats?" has led to a few trips to Salvation Army with my teeny car packed to the brim with bags of clothes, kitchen doubles, and old electronics.

So, much of our efforts and "leisure" has turned to cooking.  It's fun, exciting, delicious, and gets gobbled up eventually, leaving nothing to sit around taking up more space.  Though we have more gadgets than the average bear, we have managed to keep it all within the boundaries of the kitchen.  When I start to find gadgets hidden under the bed, or under the couch, I might have to have a decluttering rampage, much to someone else's dismay.

Many of our adventures stem from reading other blogs, and many inspirations come from the places we go, food we eat, and people we meet!  I look forward to documenting the exciting times doing what we love, with who we love, and hope you love it too!

I will leave you with one picture of our many culinary treats of the day, homemade poptarts! After a visit from my mom last weekend we were left with a big bag of rhubarb, and decided that rhubarb jam was the best use, since we could enjoy it for weeks on toast, in yogurt, or even added to smoothies!  ...or ice cream... yum.  Then thekitchn.com posted an article with mini poptarts on a stick, and I knew I had to make them.  Here are the recipes I pieced together to make it all:

Martha's basic pie crust recipe:
http://www.marthastewart.com/272973/making-pie-crusts

Random googled rhubarb jam recipe:
http://allrecipes.com/recipe/rhubarb-jam/

Inspiration thekitchn.com article:
http://www.thekitchn.com/thekitchn/food-served-best-on-a-stick-149596

Actual pop tart making article:
http://blogs.babble.com/family-kitchen/2010/09/01/poptart-pops-an-interview-with-bakerella/


Toodles.
J&H