Showing posts with label Renovations. Show all posts

Wednesday, March 26, 2014

like a basketball court

pretty, shiny, (mostly) free of scratches...

 photo 2014-03-261_zpsc2f5affd.jpg

it's all i could really ask for when we wanted to DIY refinish hardwood floors for the first time that were THAT bad...

 photo 2014-03-264_zps84a25f7e.jpg

last night we applied the second coat of polyurethane, and MAN did they look good!  we did a light sanding on the first coat of poly with 320-grit sandpaper, swept, and wiped them down with mineral spirits before applying the second coat of poly. we've been applying the poly with a sponge brush on the edges and a lambswool applicator for the rest.  it works great, except it leaves bubbles.  maybe we didn't get all the dirt out before applying the first coat? either way, after sanding the floors before the second coat, the floors felt AH-mazing!!

last night we left with floors that looked as shiny as a basketball court.  wait, is that what we wanted? we're going with it anyways. in the impulse decision of what finish i wanted to get when i was unexpectedly faced with the decision of satin, semi-gloss, or gloss.. my reaction was "go big or go home".  how that really applies here?  i'm not quite sure, but we both knew that reaction meant "go for the gloss!"

 photo 2014-03-263_zps16ed95b4.jpg

 photo 2014-03-262_zpsafb252a5.jpg
seriously, what would i do without him???  we missed a spot in one of the bedrooms after we already did the entryway, so hung spidermanned his way to getting it.  #rookiemistakes (and here i am complaining i can't even get to the bathroom when the floors are wet... i gotta step up my game)

the final day of doing anything to the floors is today, and man we couldn't be happier.  who knew it would be such hard work.  after a few days of letting the stuff COMPLETELY dry, we'll be ready to start moving in!!

guess it's time to start packing, right?  if we were moving more than 3 blocks away, i'd be more motivated to put things in boxes.  but because it's just a short distance, i have this vision that i can carry things over without messing with silly boxes..   maybe i'm crazy...  packing is the worst for me.  unpacking is SO much more fun!

cheers.
jenn

Monday, March 24, 2014

hard work is, well, hard work

i just realized that it's been a week since we made our big announcements , and i haven't shared any updates!! if you follow on instagram  or twitter , you may have seen a few sneak peaks, but this space has been pretty silent, or at least i haven't shared any photos (that's the good stuff anyways!)

between last monday and now, we've finished painting the entire apartment and trim bright white.  no "off-white", no "eggshell", no "cream", no "ivory".  literally i wanted the brightest white possible.  i would have been fine with primer if it wasn't flat paint. 

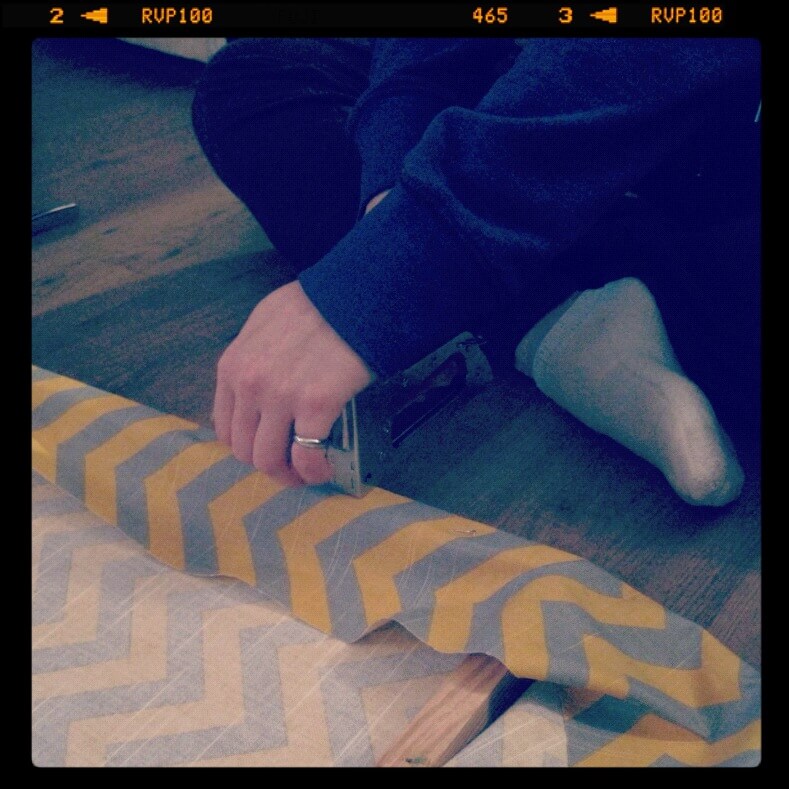
speaking of flat paint, flat paint and white walls aren't friends. it would show practically every fingerprint.  silly me, not doing my homework, i thought the next glossy-ness up from flat was semi-gloss.  so when i sent the boys out to get a 5-gallon bucket of the brightest white they could find, i told them "get semi-gloss bright white". i totally forgot about satin, and now we have sort of shiny walls.  and because hung (and practically everyone we talked to) didn't want the trim to be the same glossy-ness, we had to go to high-gloss for the trim.  kids, it looks awesome, but the catch?   IT PEELS. and it sticks to everything.  including the blue painters tape that's supposed to be your friend.  so now we have to go back and touch up all the spots that peeled off a bit when we took off the blue painters tape.  we even took a box cutter to the trim and we still had problems.  do your homework people! we were suckers for that one. lesson learned.  but... at least it LOOKS awesome when you look at the big picture.... bright white walls are my thing. i've loved it for a while, but this article on apartment therapy solidified my design ideas.

we were also lucky enough to score some skylights in the living room, so painting bright white is only going to emphasize the awesome natural light in the apartment (sorry in advance to those who slumber party at our house, you may be woken up at 5am in the summer time)

 photo 2014-03-247_zpsbd038003.jpg

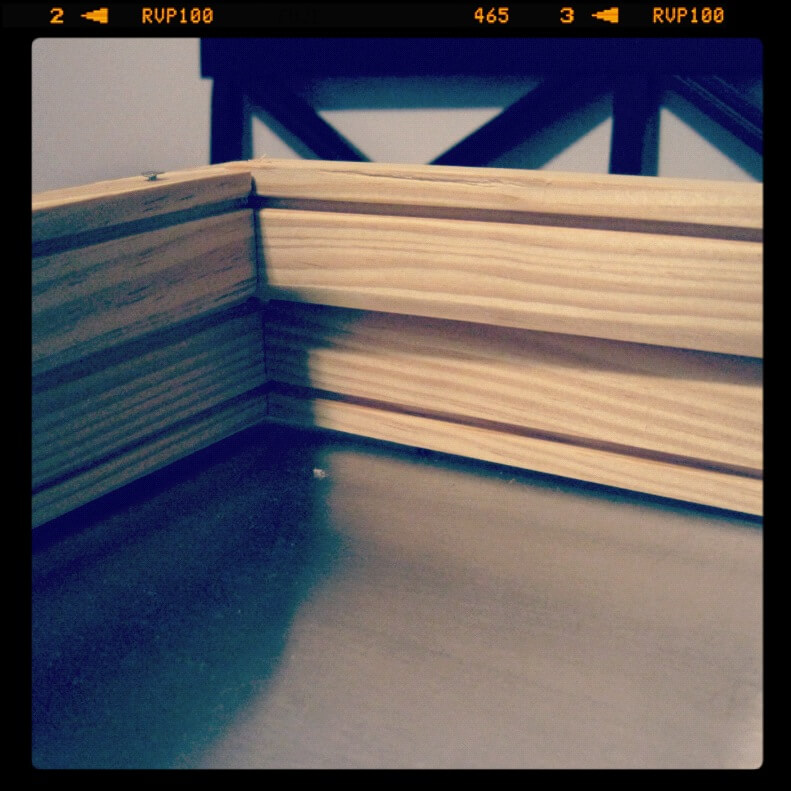
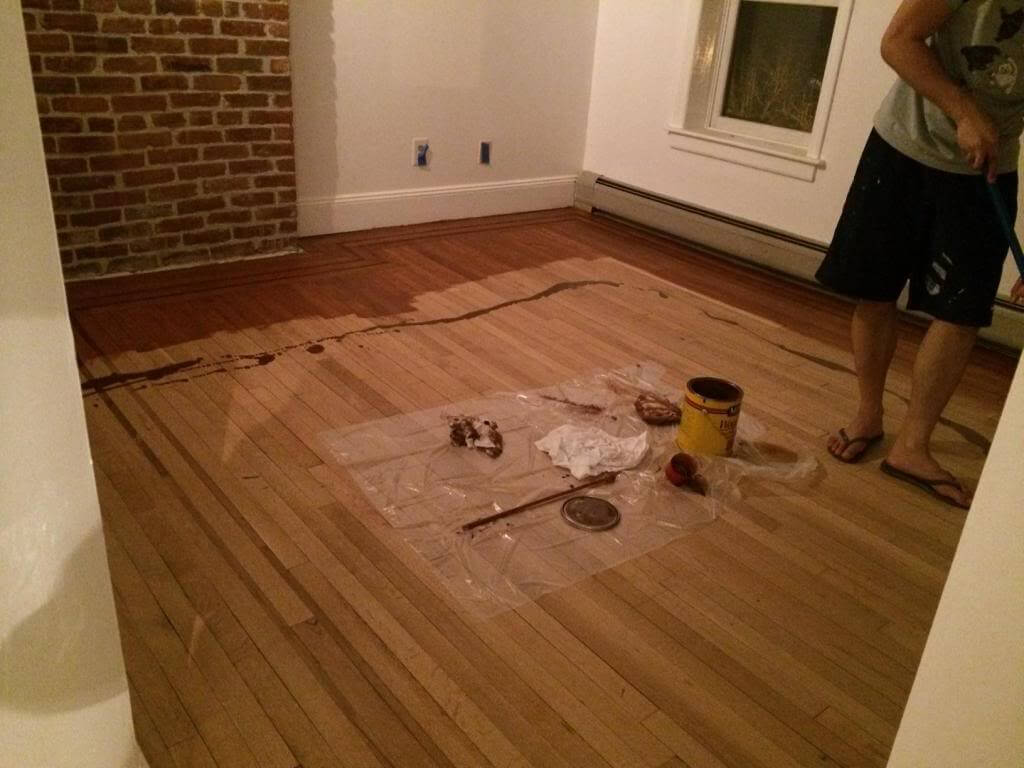
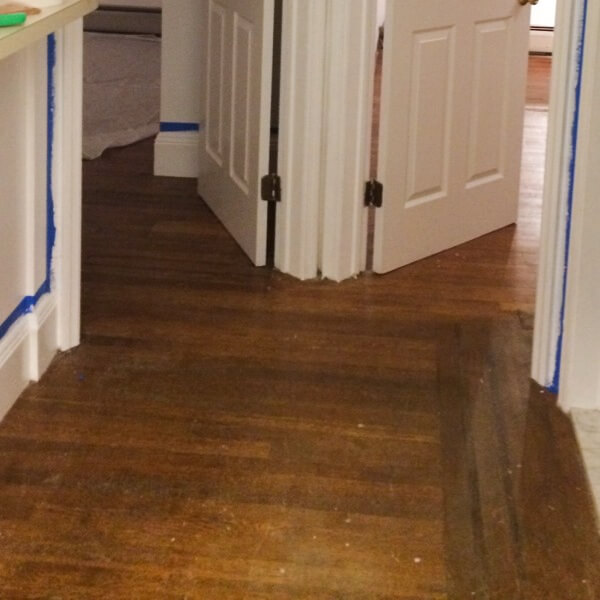
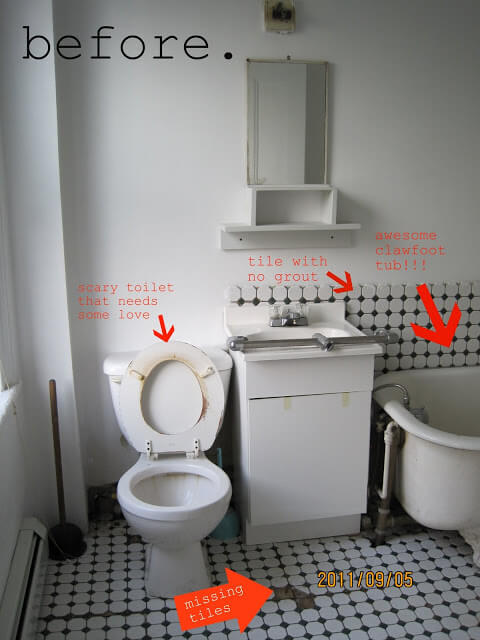
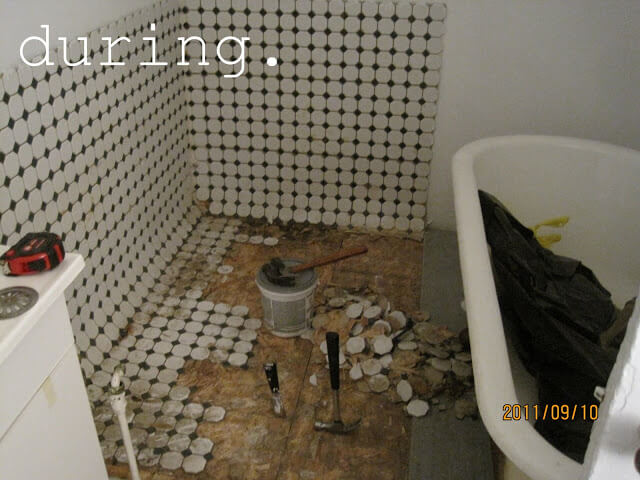
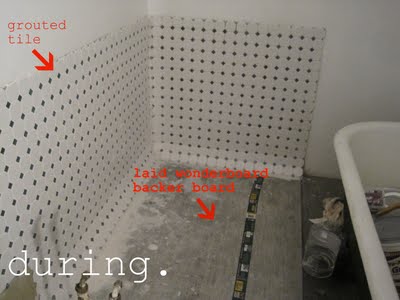
next up on our to-do-before-we-move-in list was refinish the floors.  it sounds simple enough. "sand it down, stain, and poly-coat."  friends, THIS is the hard work.  this is the back-breaking part reason people say "just pay someone to do it".  i realize now that, yes, they will obviously do a better job, because it's their job, but because it's HARD labor.  it's especially hard labor when you have to rent equipment from home depot, who takes ZERO care of their equipment. 

we initially picked up a drum sander and an edger. after 4 hours of taking off the first layer, we realized "maybe this isn't right".  we only had 2 
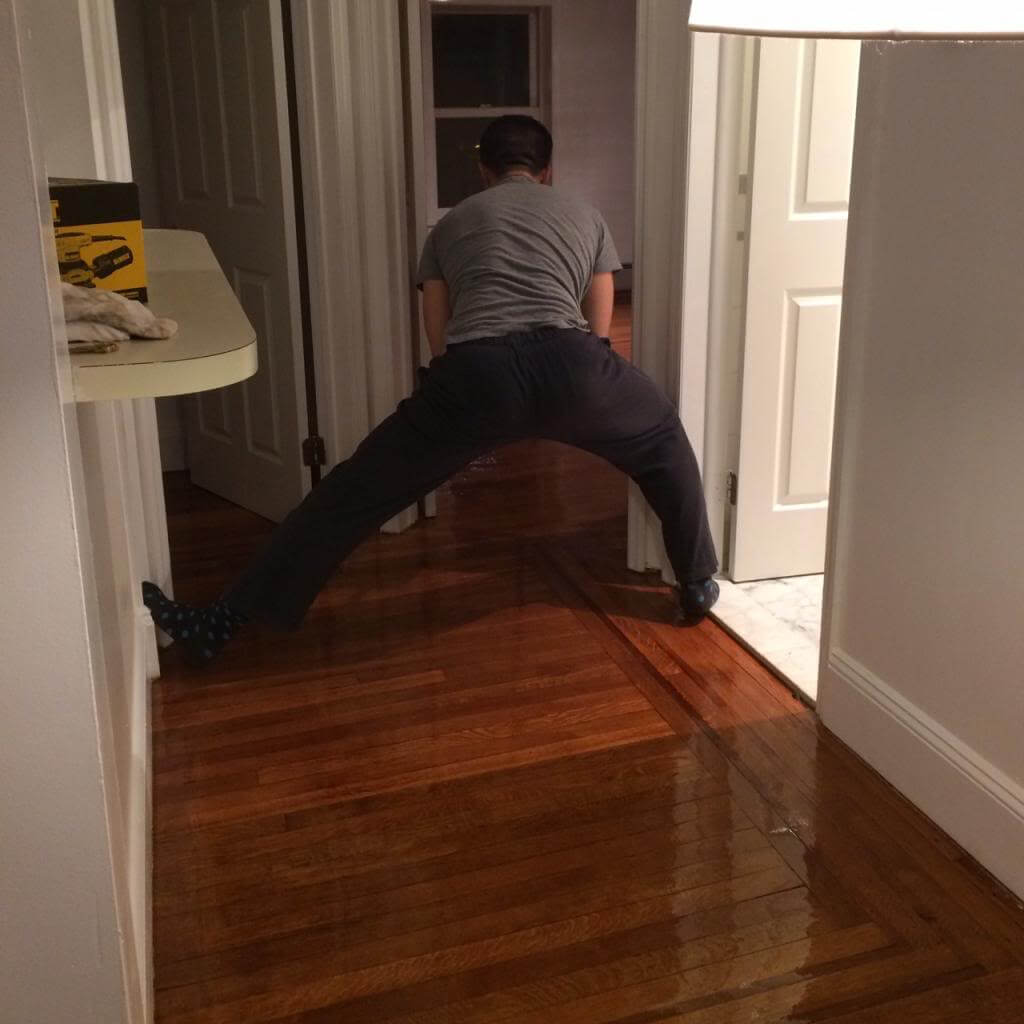
(small) bedrooms to do.  we took off the sand paper loop and realized that although the drum sander had the capability to sand about 12" of flooring, it was only sanding about 2".  that's not all.  the edger is circular sander that spins, with capability of getting right up to the edge of the wall.  however, the "edge" part of the "edger" was so worn down that we had to dip the front end of it just to sand anything.  friends, that thing is NOT light, and you have to be in a awkward, bent-over position to do it anyways.  AND when you do that it puts divots into your floor (the exact reason every youtube video we watched told us NOT to do that)

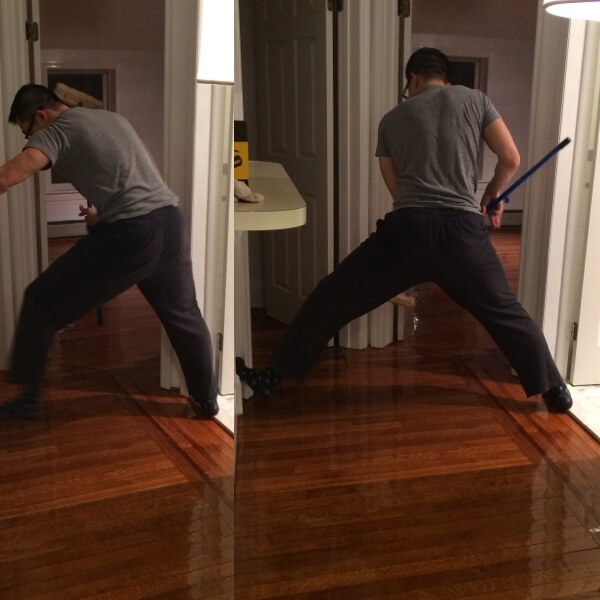
furious that we spent all day using crappy equipment, we took it all back to home depot to exchange for different equipment or get our money back.  well, there was no way to get our money back, so we picked out the best of what was there and went back to work.  the hardest part of deciding whether or not to take it back to home depot was deciding whether or not we wanted to lug that stuff up and down the 2.5 flights of stairs again.  that stuff is HEAVY.  it's a good thing hung has muscles ;) 

however, the new drum sander worked wonders, but the new edger was the same.  the nice worker at home depot gave us 2 extra hours to our rental, and thought we might be able to get the kitchen and entryway too (we didn't plan on doing it originally, because we plan to gut the kitchen in a year or so, replacing the floors in the kitchen, entry, and living room while we're at it)

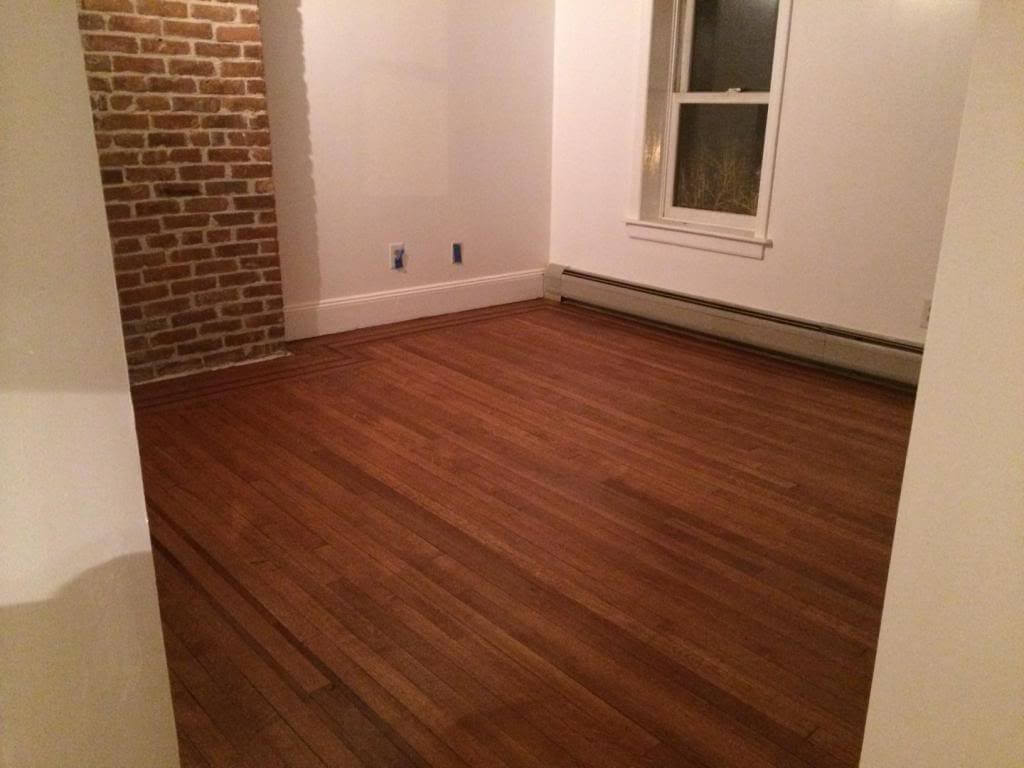
saturday night at about 12:00am hung started the stain.  although we may have finished sanding around 10:30pm, we had to prep the floors for staining, making sure there was no dust or dirt or grit on the floors.  we swept with a broom, took the shop-vac to every inch of the floors, and wiped them down with mineral spirits.

exhausted after the long day, hung graciously stained both bedrooms himself.  seriously, he's a trooper.  we're not REALLY on a deadline to get finished, but we sort of are.  we have friends coming to town this weekend (and we're SO SO excited to see them!!!) and we would "like" to be out of the current place by the end of the month so we don't have to pay another month of rent (and so our friend can move in as soon as possible!)

 photo 2014-03-242_zps2ae96efd.jpg

 photo 2014-03-243_zpsc20185e5.jpg

 photo 2014-03-244_zps9cc628a6.jpg

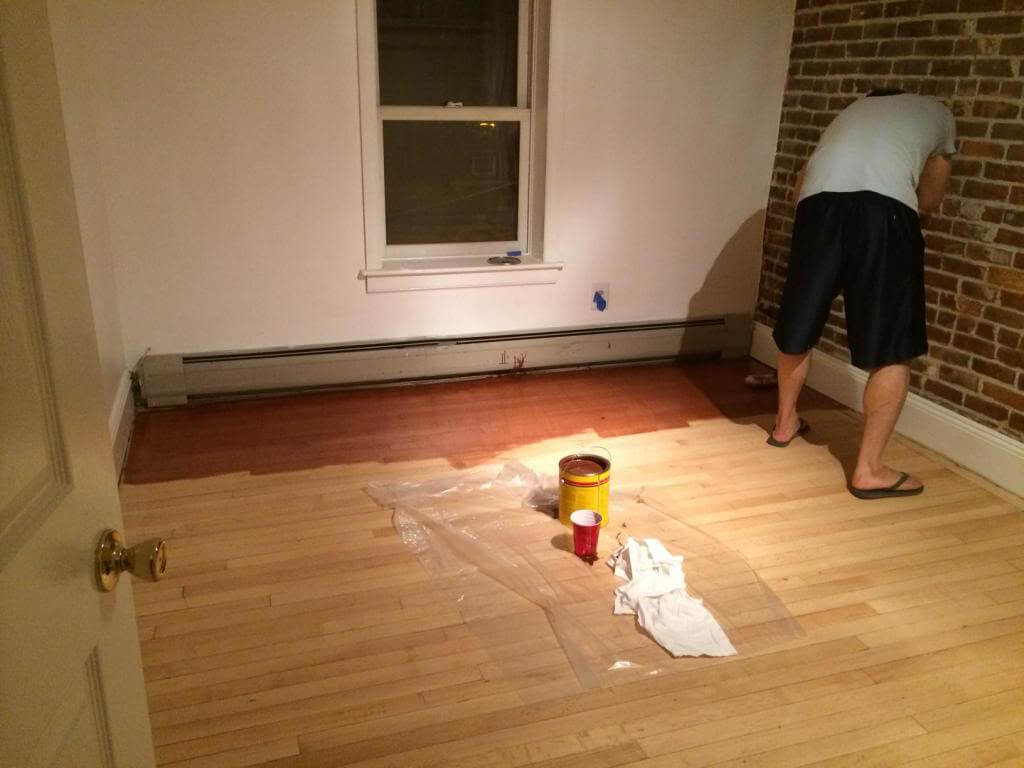
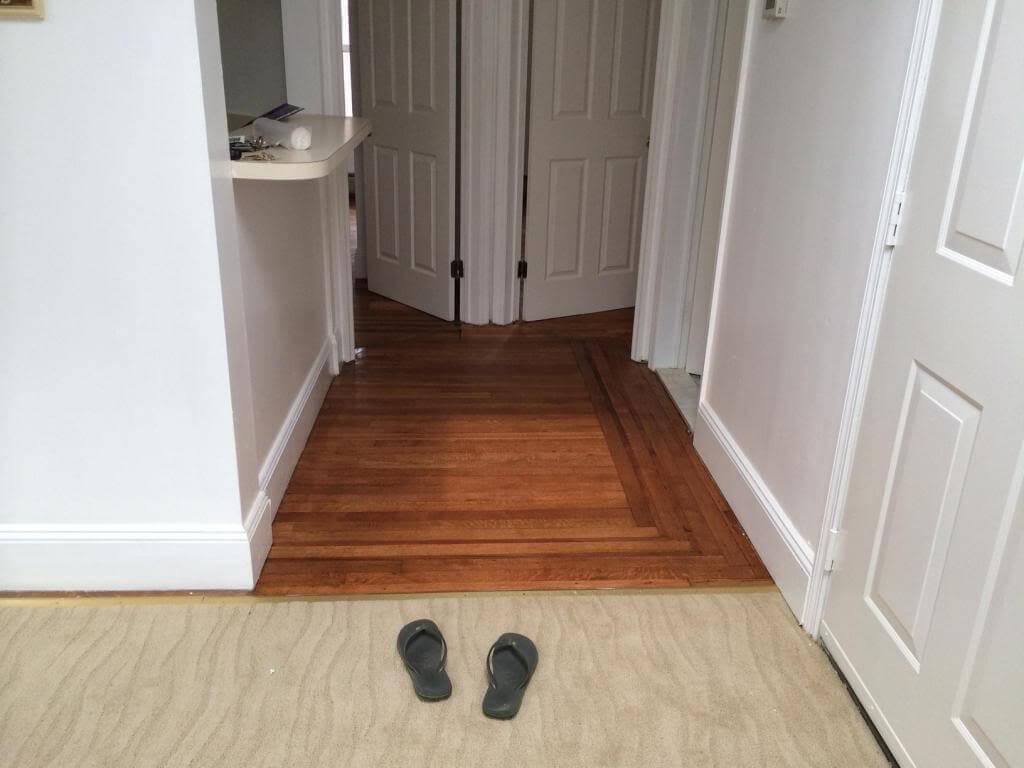
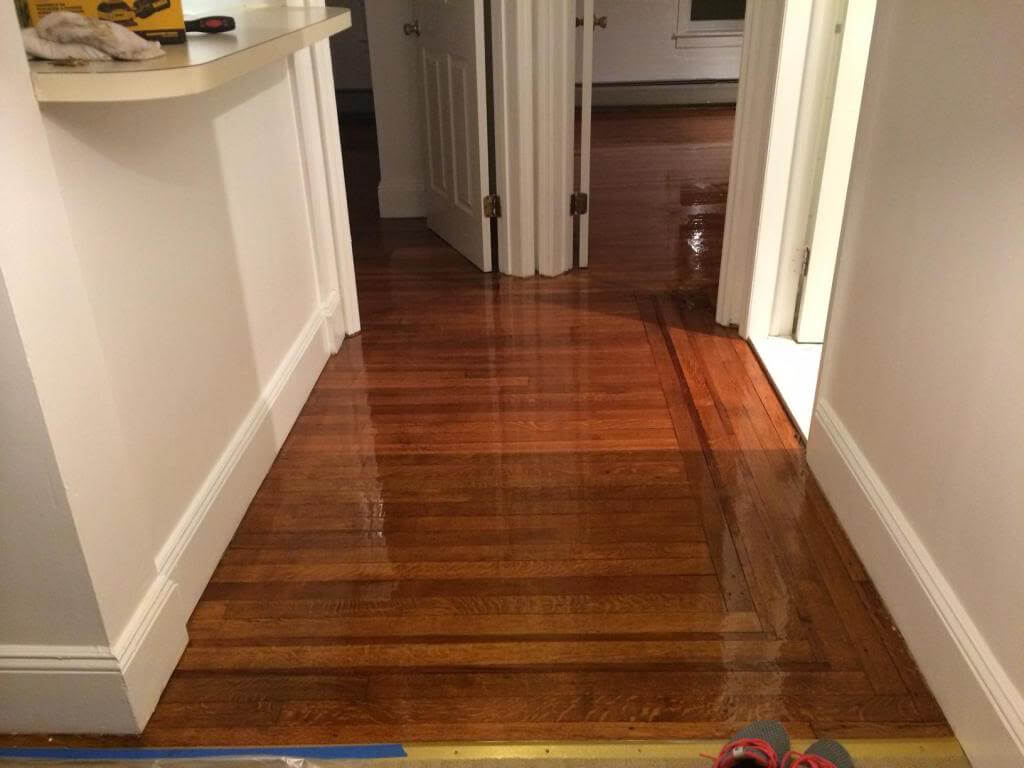
2:00am we called it quits. we figured with the extra two hours on rent, we had time to do the entryway and kitchen the next morning.  we were right! with the better drum sander, we were able to knock it out in just an hour or so.  hung and i quickly stained those floors after returning the equipment to home depot, and were done working on the house by 1:00pm.  high five!

 photo 2014-03-245_zpsb18c1e1d.jpg
(don't worry, that lighter rectangle part in the middle of the wood floor isn't a mistake, it's just the skylight shining down :P)

happy to have some free time for once, we fixed my car, got an oil change, went to the grocery store, SHOWERED, and relaxed before our friend invited us over for dinner.  he's a great cook and he's teaching another friend the basics of cooking.   luckily for us, they always make enough to share, and we often get invited to enjoy the final product (thanks guys! we definitely needed it last night!)

 photo 2014-03-246_zpsae60d775.jpg
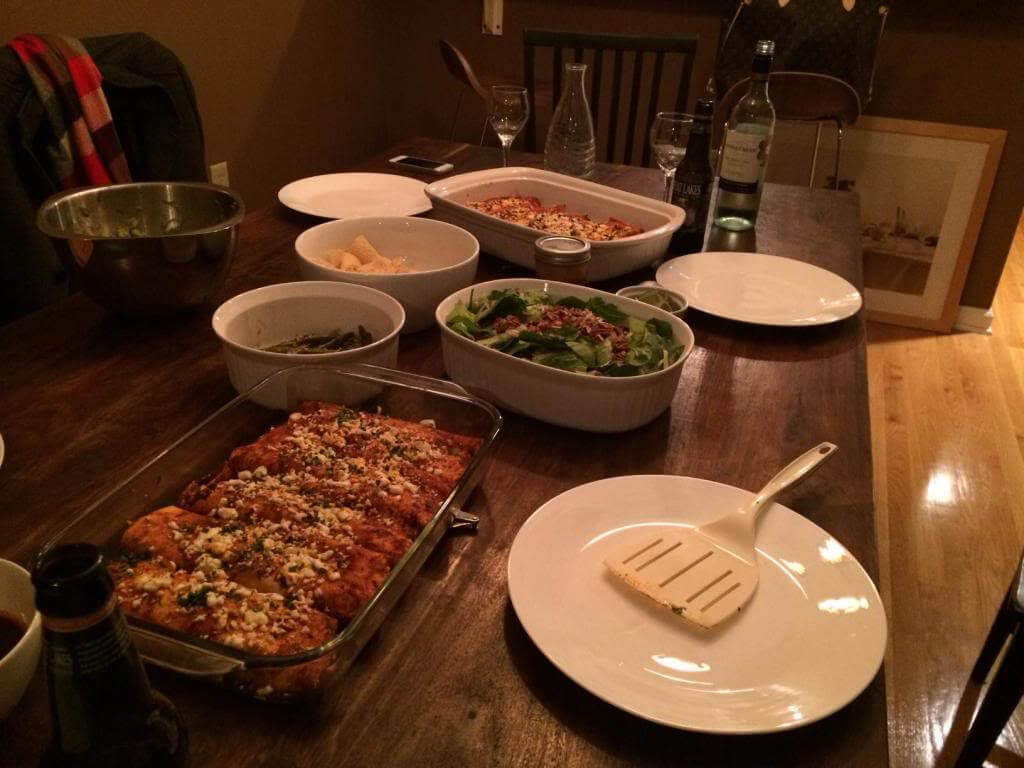
enchiladas with salad and guac and chips. aka, a recipe for a happy jenn.  mexican food is my FAVORITE.  i don't care if it's most authentic mexican food, taco bell, or (my guilty favorite) chinese-mexican . i love it  ALL .

successful weekend, but man am i exhausted.  at least the hard part is over...
(wait, we still have to move EVERYTHING in our apartment... sigh)

cheers to another week!
jenn

p.s. i promise to do a house tour soon.  it won't be the true beginning, but hey, at least you'll get to see the place before we funish it ;)

Tuesday, January 28, 2014

i don't hate my clawfoot tub anymore

 photo 2014-01-28clawfoottub_zps068236b9.jpg

thanks to a string of impulse buys at target and a 5-minute fix from that seemingly handy man in my apartment...

i no longer hate my clawfoot tub.

you see, i was so excited for it when we first moved in.  although it was a gross white color on the outside and it looked like it was painted in flat white wall paint to hide the rust, i had a vision, and we eventually made it "look" like the perfect clawfoot tub. 

- we sanded it as much as we could
- we painted it with the appropriate black glossy appliance paint, making it look practically brand new
- we installed a d-shaped shower curtain rod that hung from the walls and the ceiling
- i even found a cute white outer curtain solid with ruffles that made it look so adorable
- and mr p and a friend installed a proper shower head so we didn't have to jimmy rig a hand-held one to the curtain rod anymore.
- see the bathroom progress here .

...but i still hated it.

i hated showering in it, i hated warning people before they went in that they had to watch their step, don't slip, put the magnets in the proper place so the plastic shower curtain liners don't stick to them on all sides while they're showering, and that they had to enter from the back, so don't step on all of the shampoos and soaps on the floor.

mr p and I went to target sunday to pick up 3 things: new plastic shower curtain liners, laundry detergent, and dryer sheets. $250 later, we came home with lots impulse-but-necessary things for the bedroom, the things on the list, and FABRIC shower curtain liners.  FABRIC. 

fabric apparently makes the difference between shower curtain liners that blow in and stick to your body, and ones that don't. they're also machine-washable, so we will never have to replace them again.  they were also $11/each instead of $3/each (we need 3 to get around the whole tub).  the extra $$ is totally worth it in my opinion though. they make our shower feel SO big compared to how it used to be because the curtains hang straight instead of blowing in and grossly sticking to my skin.

last night during the time that i washed dishes after dinner, mr p moved the part of the shower curtain that hangs on the ceiling from the center of the tub to the back of the tub.  now that we have the proper shower head holding up "head" end, we could move the ceiling hanger to the "foot" end.  now we can open the shower curtain along the entire long side of the tub (aka, like a normal shower).

after getting out of the shower last night from our newly-awesome clawfoot tub/shower situation, i proclaimed to mr p with excitement, I DON'T HATE OUR SHOWER ANYMORE!

in case you missed it, and in case you're thinking about getting a claw-foot tub (to be also used as a shower) or have one and hate it (likely, if you live in a 100+ year old, barely updated brownstone like us), the key components of possibly even loving your tub are:

1. if you must paint, paint with appliance paint
2. install a d-shaped shower curtain rod and proper shower head . you can buy it as a package for fairly cheap.
3.  install the ceiling mount of the shower curtain rod to the "foot" end of the curtain. the shower head holds up the "head" end. now you can open up your shower curtain the full length of the tub.
4. FABRIC shower curtain liners.   the curtains completely surround the tub, and plastic ones grossly blow in and stick to your body.
5. get a no-slip shower mat. clawfoot tubs are deep and EXTRA slippery.  if you don't have one, you WILL slip, and you WILL regret it!

and that's how to make your clawfoot tub dreams come true!!
(otherwise, you'll be like us and live with a sub-par shower for 2.5 years before figuring out that we should have done it right in the beginning!)

cheers.
jenn

Wednesday, April 24, 2013

manly things: DIY pipe base for a desk

so... we had a bit of an unfortunate incident last weekend...
 
(but i like to think of it now as a blessing in disguise :P)
 
you know that awesome desktop we made for our iMac?
 
(ok, i admit, there was no "we" in making the desk for "mr p's" iMac) 
 
anyways, so we had already remounted the thing once, and we usually kept our elbows from resting on it for fear that it would fall off of the wall...  but give us a bottle of wine and some serious googling action, and DOWN SHE WENT!!   i suppose drywall screws aren't meant for cantilevered desks are they? we used them because there's brick behind the drywall and we don't have proper tools to mount something in it (we don't THINK anyways)
 
so mr p unexpectedly spent much of his sunday afternoon figuring out a new desk situation.  remounting obviously was the wrong choice, but with a baseboard heater at all 3 adjacent walls and sloping, uneven floors, what's a guy to do!? buying an entirely new desk was out of the question.
 
i'm going to give full credit for the solution for the final product to mary bicycles :
 
 
no, we didn't have the awesome scavenger find of a butcher block countertop, but we DID have a DIY'ed desktop that mr p and his friend zack made last summer (sentimental value and all)
 
 photo photo_zpsecdf77b7.jpg  
(sorry for the terrible phone-quality pic.. i'm in boston and it's all i had, and i REALLY wanted to share it with you all!)
 
mr p simply followed the instructions using modified measurements for our table (modified for width, height, and making sure the back legs were forward of the baseboard heater in the back), and took off for home depot.... a few cuts at the store, a little screwing together at home, and a few screws into the desktop and voila! a new AWESOME-looking, loft-ish-inspired desk!  mr p even told me he sat on it to make sure it was sturdy.  pretty sure we can rest our elbows on it when we get a bottle (or 2 or 3) of wine in us and get some omg-you-have-GOT-to-see-this mentality going on :)
 
doesn't it look fantastic!? 
between mr p stepping up to DIY this awesome desk, cleaning the ENTIRE house, picking my mom up from the airport, cooking her dinner while i was still away in boston, and tolerating our quirkiness together this weekend... makes me want to just squeeze him to pieces and shout to the world that i'm the luckiest girl in the world :)

(cheeseballfest is over)
(but really though, he's a pretty cool dude)
 
cheers.
 
 
p.p.s. more DIY's and renovations
p.p.p.s. did you know we're on instagram (@beyondthestoop)  and bloglovin?

Tuesday, April 16, 2013

bathroom update

it's been a WHILE since I've posted an update on our apartment.  though we aren't really "renovating" anymore, we still make changes here and there, and before you know it, it's a totally different space!

the bathroom is one such room.

last weekend i had HAD IT with the ugly over-the-toilet ugly metal rack that wasn't over-the-toilet (leftover from the old apartment).  it housed basically all of my bathroom essentials, so i couldn't get rid of it until i had a solution in hand.  mr p and i took butts to home depot and got ourselves some DIY'ed shelves just like the ones in the kitchen and the living room

(WHY didn't we think of this before if we did the same thing in every other room!?)

mr p did it all by himself too! he's a pro at these shelves by now.  check out a quick adventure through the progress:

 photo bathroombefore_zps6201ef9c.jpg
 
 photo IMG_7990_zps75f49609.jpg
 
 photo IMG_8042_zpse6ebcbba.jpg  photo IMG_8052_zps3e27b0bc.jpg
 
 photo ba452fa0-6946-4718-9b23-7f6115fc3e3e_zps7379d04c.jpg  photo 4032f9bb-39be-4356-8d0a-ad867bcb5d41_zpsa217bfc1.jpg
 photo 327792fa-4ee6-4d6d-a18f-bfdac42f2d09_zps8c654b21.jpg
yikes! we went for SO long like this. no full-length mirror, ugly metal over-the-toilet thing that's not over-the-toilet, overflowing laundry (thanks to kickboxing ), overflowing bins of bathroom stuff i don't use, stained towels
(guess the dye doesn't stay in your hair too well if you dye it 3 times in one day... oops?)
 
 photo 2b83725f-a93b-4cb8-99e7-0d43246f97e0_zps1ac933be.jpg  photo 0c958f3e-fce1-43ce-ac2f-ff7794260688_zps2cb0b754.jpg
 ahhhhhh.... so much better.
(p.s. chevron fabric stretched over a wood frame, DIY instructions here)
(p.p.s. with the new mirror we didn't have room for 2 fabric frames, so i "recycled" old photo frame and cut the fabric to fit!  great second use if you ask me)
(p.p.p.s. i spray-painted the yellow chair here)
 
now if i could just part with my laundry basket i've been toting around since high school (through all 14 moves and everything)
 
i just want to find one that looks nice, isn't $100, and isn't something you see in every big box store.
(i may settle for something like that, but i'm going to try my hardest to find something spunky and unique!)
 
does anyone have any good resources for fun hampers?
 
(wait did i just say that? i MUST be getting older if i'm excited to look for laundry hampers)
 
cheers!
 

Wednesday, September 12, 2012

reminiscing the renovations

last year on this day   (ok, last year on 9/11) , it was sunday, and mr p and i were busy busy bees.


we had just started renovations on our "new" jersey city apartment. it was day 7 of renovations, and that day we:
   - laid trim
   - ripped up the bathroom tile floors
   - laid new backerboard
   - grouted the bathroom tile
   - painted the tub with appliance paint
   - bought a stove
   - ripped out the bathroom vanity

i'm SO happy those days are over! small bits of renovating have continued to creep up now and again, but that first month of having keys to the new place was BRUTAL! (i guess our relationship can survive anything if we survived THAT!)

we actually did a LOT of renovations to our tiny apartment in our 100+ year old building.  check out the beginning of the story here (or click renovations on the left side bar)

what's your story? did you do any fun renovating or decorating in your home? tell us about it!

cheers!

Monday, August 6, 2012

rex ray postcard prints

if you haven't heard of rex ray, just google-image his name (or click here ).

his prints are SO fun.  and i've been a fan for a while.  but, it's hard to choose just one.

when i visited college friends in michigan in april, i snagged this postcard book of THIRTY prints for just $10!!! it was a STEAL in my opinion.  i had no intentions of ever using them as postcards, i always had my vision of framing them.  


so, i finally went to ikea to find MANY cheap, white frames , and came across white 4x6 frames, 2 for just $3!! score!

the postcards were slightly larger than 4x6, so i had to trim each of them down (pain in the BUTT!)


we then went to home depot and bought 2 10-ft long 1x3 boards .  chopped into 4 lengths of 56.5", we only wasted about 7 inches from each board!  each 10' board was only $5.58.  we had to buy 3 packs of 2" corner braces , $4.68/pack of 4, to mount the 1x3's to the wall (though we now realize we only need 2 because the frames are SO lightweight).

we installed the braces to the boards, made sure the boards were level on the wall, and drilled the screws into the wall, spacing each with 11" clear space!


i haven't really made sure the frames are all evenly spaced yet, i think i might need an OCD friend to come do that for me, because now that they are at least UP , i will probably put off putting them all in their REAL home for a while :P  i'm just happy we finally have some art above the new desktop!

materials:
24 postcards (or 24 4x6 pieces of fabric, scrapbook paper, fun magazine clippings, be creative!)
24 cheap, identical frames
1x3 boards, cut to desired length
2 corner braces per board, plus more if needed*

tools:
scissors (if paper/postcards are not the correct size)
tape measure
level
drill (or screwdriver and strong MUSCLES to screw in the screws!)

instructions:
1. cut postcards/paper to size and put in frames
2. measure location of corner braces on 1x3 boards, making sure to install them at the same distance from the end, each end, each board.  install corner braces by pressing (1) 1x3 up to a flat, vertical surface, placing the brace up tight to the vertical surface and flat against the board.  install screws with screwdriver or drill.
3. measure where each board is to be placed on the wall, evenly spaced, and leaving the same clear space at the top near the ceiling.
4. hold (1) shelf in place and adjust with level (may need 2 sets of hands for this step and from here on out, depending on the length of your shelf!)
5. drill screws into remaining wall holes of the braces.
6. repeat for remaining shelves.
7. lean all 24 frames against wall resting on the shelves.

voila!

cost breakdown:
postcards = $10
frames = $3/ 2 frames, 24 frames = $36
boards = $5.58, 2 boards = $11.16
brackets = $4.68/4, 3 packs = $14.04

total = $71.20

so, for WELL under $100, we filled up a whole wall full of art.  not. too. bad. IMO

keep in mind my space was 56.5" long, and i used 4x6 frames.  this method can be used with ANY size frames on ANY length of wall.


enjoy!

cheers.

p.s... thinking about painting the UNDER SIDE of the shelves a fun color... thoughts? color suggestions??

Thursday, June 28, 2012

big kids, big toys

like...

a new car?

a house?

a boat?

(get real people, we're still kids. apparently it's normal around here to still be living at HOME at the ripe age of 25, so we're at least adults in the sense that we DON'T live with the rents.) 

mr p decided that he wanted a new computer!
so, what does a 20-something with no house, kids, car (or payments), or student loans do?

just do it!
(sorry, nike, for stealing your slogan)
...aaaand build a desk to go with it.
(thanks, zack, for your enginerd expertise)
i'm going to think that mr p was thinking ahead, and when my blog is big enough it replaces my day job, this will be my "office" instead of his "gaming center". right, babe? :) :) :)

now we just have to sell the macbook air he bought 6 months ago (any takers??), do SOME thing about those cords, and decorate the desk and the blank wall behind it!! (i have a fun idea to use rex ray prints has been started, and should be finished soon!!)

cheers!

Tuesday, January 24, 2012

for the love of "new" things

i am always jealous when i see house tours of beautifully decorated homes (like this one), then come to find out that most of their furnishings are from a thirft store, vintage store, craigslist, or (brace yourself) dumpster-dive finds.

how can anyone FIND that kind of stuff without looking on craigslist everyday or spending every free minute going through stores looking for this stuff??  everything i always see on craigslist that's labeled "vintage" really should be called "old, ugly, worn-out crap."  i've learned that when people want to get rid of stuff fast, they use those buzz-words like "vintage" or "modern" or "antique," whether it really is or not.
so, i've curbed my searches to include just what i'm looking for. whether it's an end table or kitchen table, i will even just type in "table" and the price i'm willing to pay.

i haven't been really searching for another chair (although we were really on the market for one), but i got bored at lunch last week, so i thought i would peruse craigslist.  i searched "chair", with image, between $20 and $200, and i FINALLY got lucky!  i found this chair for $75 and it was only 1 block away from our house! (score!!)  i was supposed to see it on sunday after we got home from philly, but i totally forgot :(  i HATE it when i'm trying to sell something on craigslist and people flake out, and as much as i hate to admit, i was totally "that" person!! (ugh, kick myself in the butt).

luckily the girl still had not sold it and we were still able to buy it!  we tried to talk her down in price, but she said if we didn't get it, there were others interested, so she wouldn't go down.  BUT , mr p worked his charm and we did end up staying and chatting through an entire bottle of wine (oops! guess i wasn't planning on going to the gym). so i suppose you could say we got a chair AND a new friend for the low price of just $75 :P

so, here's our "new" $75 conversation chair.  it's wooden with a high back, with blue velvet upholstering on the seat and back.  there are a few snaggles here and there, but for $75 you can't beat it!


i LOVE the details in the wood 

(please don't mind the christmas decorations... i like them too much to take them down, but last night mr p put his foot down and told me they have GOT to go...)

now we finally have "conversation" seating in our living room, with 2 chairs opposite the couch (sheesh it was so awkward before we got those chairs... 4 adults sitting in a row on the couch trying to talk to each other)

our apartment is starting to look more like a home instead of an ikea catalog!! we didn't THINK we had much until our friend karen starting pointing out so many things from ikea, and totally opened our eyes to how much we REALLY had from there.

remember to follow me by clicking "join this site", or receive email notifcations of new posts by submitting your email in the "follow by email" button, both on the right side of the page.

cheers to a good craigslist find, and to switching it up from blah ikea stuff :D

toodles.
j&h

Tuesday, December 27, 2011

Chevron Chic

Chevron (i.e. fancy shmancy name for zig zag) is the new "it" pattern, and I'm totally jumping on the bandwagon, because I just love it .

I've been putting off decorating the bathroom for a while now, mostly because I'm just so burned out from doing all the OTHER renovation stuff in the apartment! (though I'm quite pleased with the way it all turned out!!!)

I wanted the accent color in the bathroom to be yellow, with the rest of the decorations being white, black, and anywhere in between.  I also wanted to find super fun unique art to display, and told Mr P that this could be his place to shine (with his quirky mind and quirky monster obsession). 

We ended up purchasing this little guy at "Not Yo Mama's Craft Fair" at the last JC Fridays event in Jersey City from kudu-lah


Mr P saw monsters and a ginger (i.e. redhead) and instantly veered towards the table.  I immediately knew we were going to come home with SOME thing ;)  We came home with "Skitch", and he's now hanging on the wall right when you enter the bathroom.

I couldn't decide on another print or piece of art without emptying our pockets along the way, so I decided to recover my old Ikea wood frames with new fabric.  I found this yellow and gray chevron fabric from Bobbie Lou Fabric on Etsy.com, and I instantly fell in love!!  The fabric was wide enough so I could get both frames covered with just 1 yard! yayayaya

I got the fabric in the mail just before we left for the holidays, and finished the project the day we got back (talk about excitement!!)


First, I stripped the frames of the ugly-child-like fabric I originally covered them with (what was I thinking??)


These $5 frames are the best because they already have a ledge on the inside to catch a nail head.


I then double-checked that the fabric would cover both frames by folding it in half and putting a frame over it.


I then cut the fabric in half and laid out 1 frame with the fabric.  I measured 3" on the same side of fabric and 2 corners of the frame so I knew the fabric would be square with the frame.


Then I stapled 1 staple at the center of each side of the frame with a staple-gun.  I next stapled a few more staples on each side, pulling the fabric tight before stapling.


Then I folded and stapled the corners by placing 1 finger on each of 2 sides of the corner, and making 2 folds with the fabric so that the outer fold was square with the corner (ahhhh don't mind my chippy polish!! I couldn't find a way to hide it and show what I needed to show you!!)


Lastly I trimmed the edges of excess fabric, and then hung the frames on the bathroom wall with just 1 nail (you can use two if you choose, but make sure they are VERY level!)


Done!  This project is one of my favorites so far, because it's fast (took less than an hour to complete), it's cheap (I already had the frames, which are cheap at $5 anyways, and the fabric with shipping cost only $15), and it's easy (all you need to complete it is fabric, frames, staple gun, and scissors).

This project is perfect for someone looking to get color on white walls, cheap art for a rental where you don't know if it will match the decor at the next place you live, a baby room where you don't want to spend all your diaper money on silly art that will have to go away in a few years anyways, or many many other options.

Hope you enjoy!

Toodles.
J&H